Adding Firewall Rules
What Is a Firewall
A Firewall is…
There are…
Configure LAN Rules
The default for pfSense is to block all incoming connections on the WAN interface and to allow all incoming connections on the LAN interface. That is any traffic initiated from the LAN is allowed through the firewall and any traffic hitting the WAN interface is dropped…
This section describes how to configure the LAN interface to only allow connections for specific services (DNS, NTP, Web, E-Mail, FTP, etc) and block everything else initiated from the LAN.
System Admin Rules
Although pfSense has a default ‘Anti-lockout Rule’ it is not ideal as it allows port 80 and port 443 connections from anywhere and does not cover SSH.
A more secure approach will only allow HTTPS (Port 443) and SSH (Port 22) connections to the pfSense LAN address from only the clients on the LAN network.
First an alias will need to be created for the management ports.
- Navigate to Firewall - Aliases and select the Ports tab.
- Create an alias called ManagementPorts and specify the two ports.
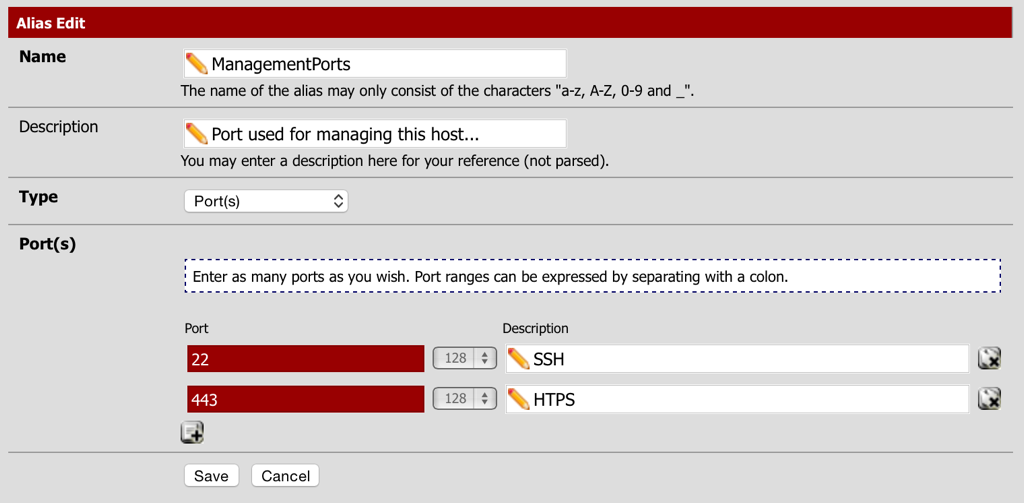
- Select Save and the Apply Changes.
Now create the actual rules:
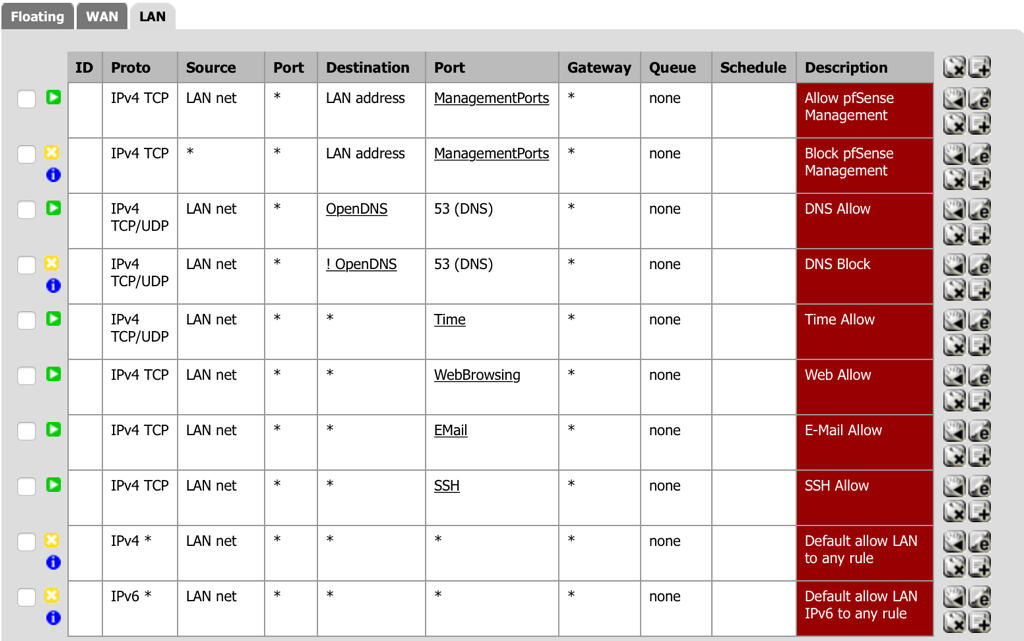
- Navigate to Firewall - Rules and select the LAN tab.
- Select add a new Pass rule for TCP from the LAN Network to the LAN Address management ports (the alias created above).
- Action: Pass
- Interface: LAN
- Protocol: TCP
- Source: LAN net
- Destination: LAN address
- Destination port range (from): other - ManagementPorts
- Description: Allow pfSense Management.
- Select Save.
- Select add a new Block rule for TCP from Anywhere to the LAN Address management ports (the alias created above).
- Action: Reject
- Interface: LAN
- Source: any
- Destination: LAN address
- Destination: port range (from): other - ManagementPorts
- Log: Checked
- Description: Block pfSense Management
- Select Save.
- Order the firewall rules to have the Pass rule at the top of the list and the Reject rule second.
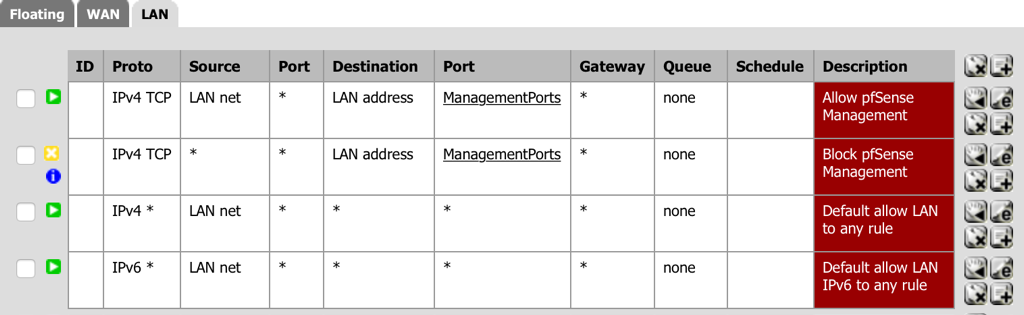
- Select Apply Changes.
- Select Save.
Progress Check
At this point any client computer on the LAN network should be able make either an SSH or HTTPS connection to the pfSense host.
DNS Rules
Force the use of the DNS servers specified in the Services - DHCP Server tab. The idea here is to ensure that only the DNS servers configured in pfSense are used and that no client on the LAN can bypass that setting.
For this project OpenDNS provides external filtering and pfSense is configured to enforce it’s use by all LAN clients, the alias is named accordingly
First an alias will need to be created for the configured DNS server addresses:
- Navigate to Firewall - Aliases and select the IP tab.
- Create an alias called OpenDNS and specify the OpenDNS IP addresses.
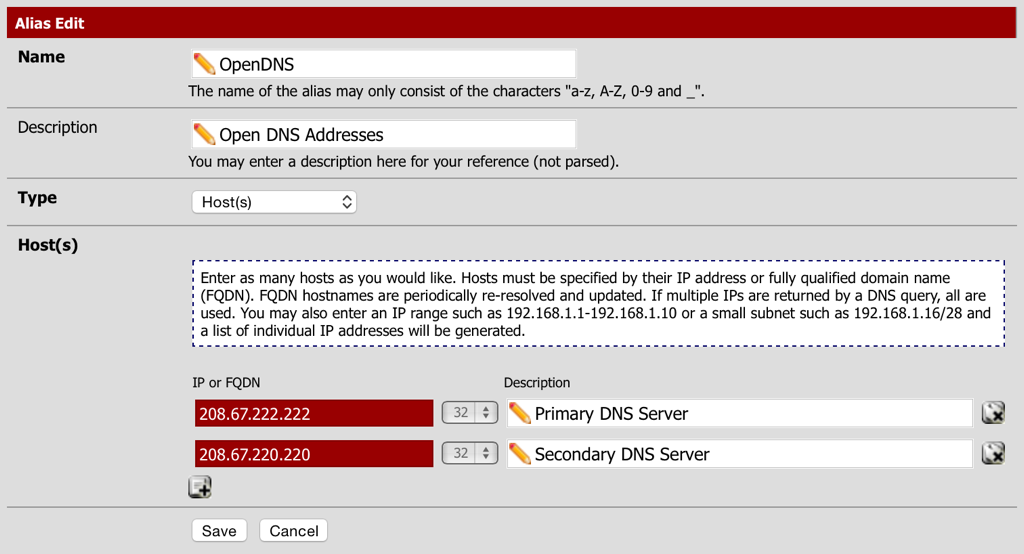
- Select Save and the Apply Changes.
Now create the actual rules:
- Navigate to Firewall - Rules and select the LAN tab.
- Select add a new Pass rule for TCP/UDP from the LAN to OpenDNS (the alias created above) for DNS traffic.
- Action: Pass
- Interface: LAN
- Protocol: TCP/UDP
- Source: LAN net
- Destination (Type): Single host or alias: other - OpenDNS
- Destination: port range (from): DNS
- Description: DNS Allow
- Select Save.
- Select add a new Block rule for TCP/IP from the LAN to Not to OpenDNS (the alias created above) for DNS traffic.
- Action: Reject
- Interface: LAN
- Protocol: TCP/UDP
- Source: LAN net
- Destination (Type): Single host or alias: other - OpenDNS
- Check the ‘not’ checkbox
- Destination: port range (from): DNS
- Log: Checked
- Description: DNS Block
- Select Save.
- Order the firewall rules to have the Pass rule before the Block rule, keeping the DNS rules together (one under the other).
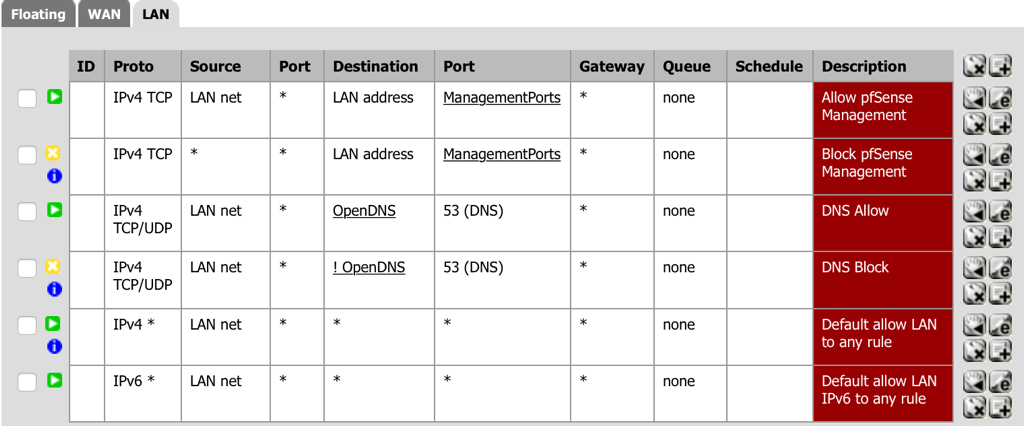
- Select Apply Changes.
Progress Check
At this point if any client computer has manually overridden the DNS settings provided by DHCP it will not be able to resolve domain names (normal web browsing will not work).
NTP Rules
Allow any client computer on the LAN access to the Network Time Protocol, this will allow automatic clock synchronisation.
First an alias will need to be created for NTP (Port 123):
Allow any client computer on the LAN access to the Network Time Protocol, this will allow automatic clock synchronisation.
First an alias will need to be created for NTP (Port 123):
- Navigate to Firewall - Aliases and select the Ports tab.
- Create an alias called Time and specify the NTP port.
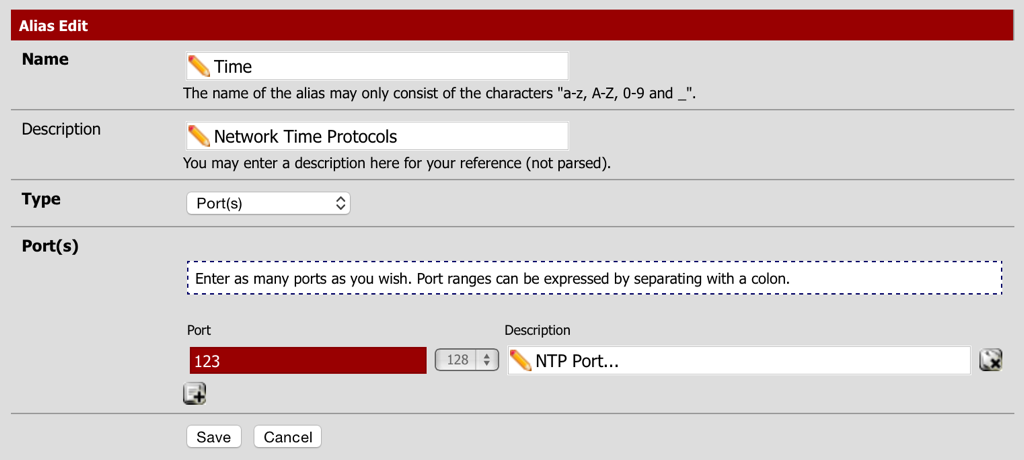
- Select Save and the Apply Changes.
Now create the actual rules:
- Navigate to Firewall - Rules and select the LAN tab.
- Select add a new Pass rule for TCP/UDP from the LAN to anywhere for Time (the alias created above) for NTP traffic.
- Action: Pass
- Interface: LAN
- Protocol: TCP/UDP
- Source: LAN net
- Destination (Type): any
- Destination: port range (from): other - Time (the alias created above for NTP).
- Description: Time Allow
- Select Save.
- Order the firewall rules to have the Time rule after the DNS rules.
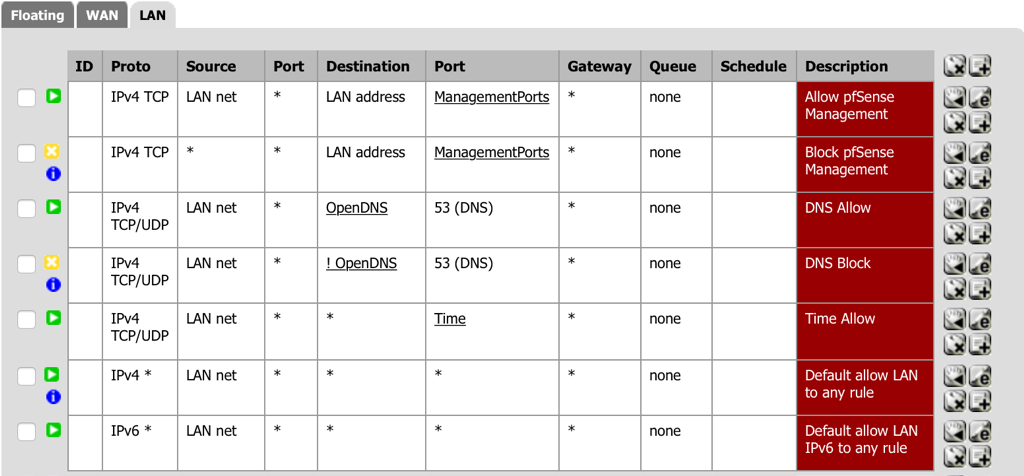
- Select Apply Changes.
Progress Check
Any client computer should be able to access their configured time source and synchronise their clocks.
Web Browsing Rules
Now that the basic system services are taken care of it’s time to allow any client computer on the LAN access to web browsing.
For web browsing only two ports are required port 80 for HTTP traffic and port 443 for HTTPS traffic. Only TCP is used for web browsing.
A specific rule for HTTP and HTTPS will be required once the default allow ‘LAN to Any’ rule is turned off.
First an alias will need to be created for HTTP (Port 80) and HTTPS (Port 443):
- Navigate to Firewall - Aliases and select the Ports tab.
- Create an alias called WebBrowsing and specify the two ports.
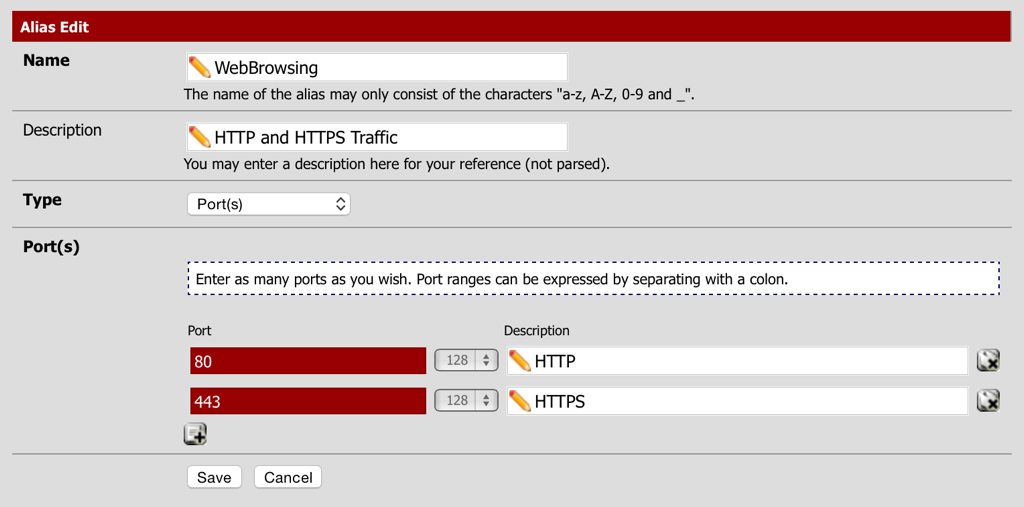
- Select Save and the Apply Changes.
Now create the actual rules:
- Navigate to Firewall - Rules and select the LAN tab.
- Select add a new Pass rule for TCP from the LAN to anywhere for WebBrowsing (the alias created above) for HTTP and HTTPS traffic.
- Action: Pass
- Interface: LAN
- Protocol: TCP
- Source: LAN net
- Destination (Type): any
- Destination: port range (from): other - WebBrowsing (the alias created above for web browsing).
- Description: Web Allow
- Select Save.
- Order the firewall rules to have the Web rule after the Time rule.
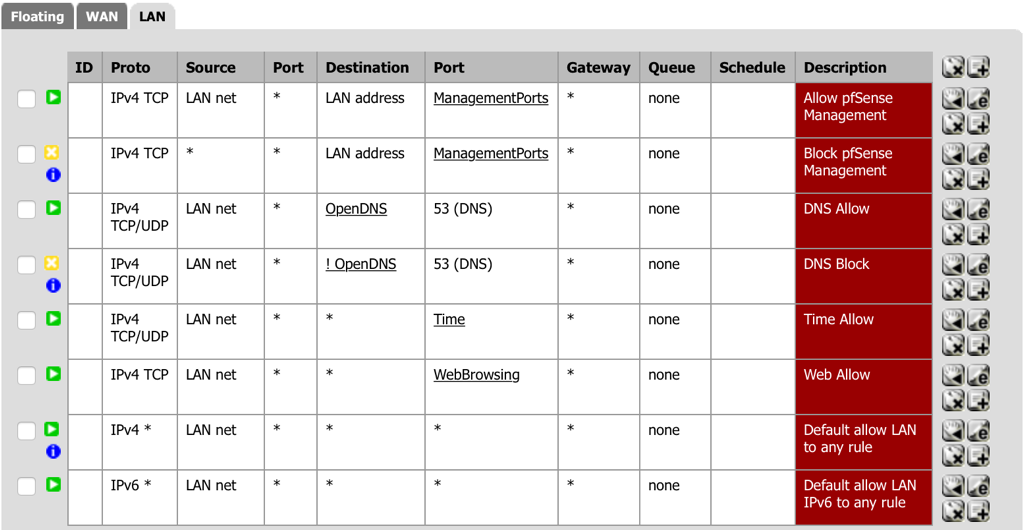
- Select Apply Changes.
Progress Check
Any client computer should be able to browse the internet.
E-Mail Rules
The second most popular thing will be to allow any client computer on the LAN access to e-mail.
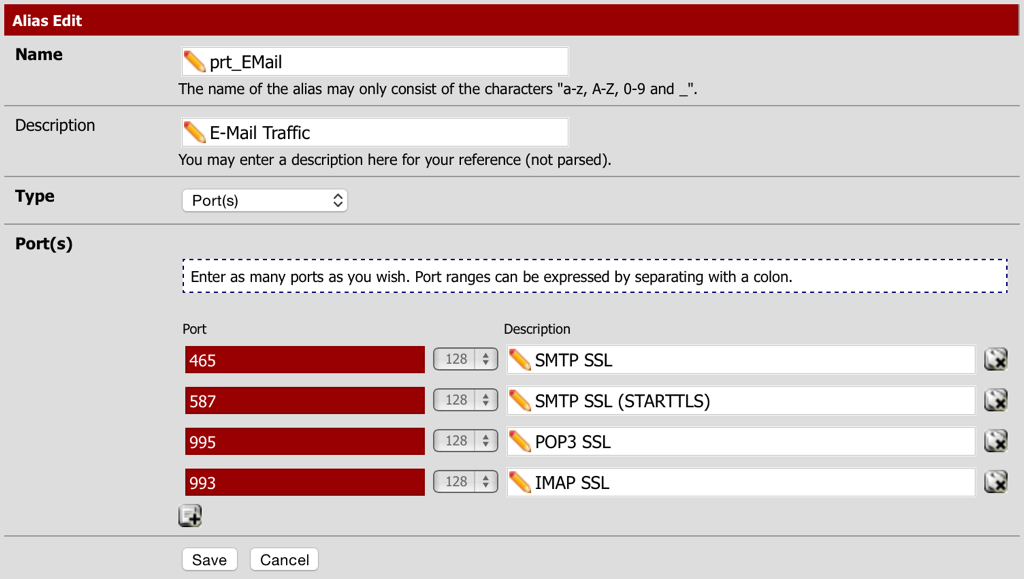
For e-mail there are many ports to consider, ports 25 for SMTP, 465 and 587 for SMTP SSL. Then port 110 for POP3 and 995 for POP3 SSL. Finally port 143 for IMAP and 993 for IMAP SSL.
A specific rule for SMTP, POP3 and IMAP will be required once the default allow ‘LAN to Any’ rule is turned off.
For this project only the secure (SSL) ports will be enabled and all clients will be configured accordingly.
First an alias will need to be created for SMTP (Port 465 and 587), POP3 (Port 995) and IMAP (Port 993):
The second most popular thing will be to allow any client computer on the LAN access to e-mail.
For e-mail there are many ports to consider, ports 25 for SMTP, 465 and 587 for SMTP SSL. Then port 110 for POP3 and 995 for POP3 SSL. Finally port 143 for IMAP and 993 for IMAP SSL.
A specific rule for SMTP, POP3 and IMAP will be required once the default allow ‘LAN to Any’ rule is turned off.
For this project only the secure (SSL) ports will be enabled and all clients will be configured accordingly.
First an alias will need to be created for SMTP (Port 465 and 587), POP3 (Port 995) and IMAP (Port 993):
- Navigate to Firewall - Aliases and select the Ports tab.
- Create an alias called E-Mail and specify all the ports listed above.
- Select Save and the Apply Changes.
Now create the actual rules:
- Navigate to Firewall - Rules and select the LAN tab.
- Select add a new Pass rule for TCP from the LAN to anywhere for Email (the alias created above) for SMTP, POP3 and IMAP traffic.
- Action: Pass
- Interface: LAN
- Protocol: TCP
- Source: LAN net
- Destination (Type): any
- Destination: port range (from): other - EMail (the alias created above for e-mail traffic).
- Description: E-Mail Allow
- Select Save.
- Order the firewall rules to have the E-Mail rule after the Web rule.

- Select Apply Changes.
Progress Check
Any client computer should be able to send and receive E-Mail.
FTP Rules
FTP is a very old protocol that sends all communication in plain text including username and password, it is an insecure protocol don’t use it!
If there is no other option and FTP must be used there are several ports required, port 20 (FTP) and port 21 (FTP Control) or port 989 (FTPS) and port 990 (FTPS Control). Also if passive FTP is required then all ports numbered greater than 1024 and less than 65535 may need to be opened.
SFTP Rules
A better option is to use the SFTP (SSH File Transfer Protocol) as all communication is encrypted.
A specific rule for SSH will be required once the default allow ‘LAN to Any’ rule is turned off.
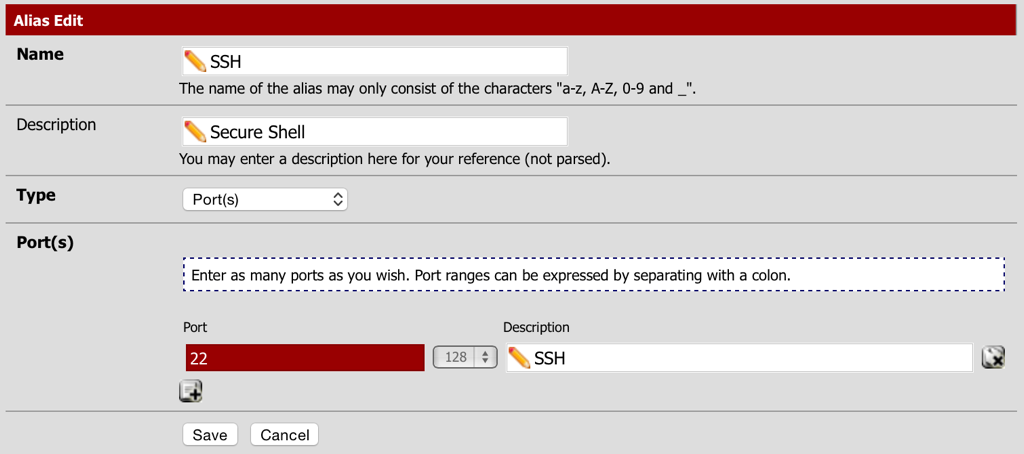
First an alias will need to be created for SSH (Port 22 is the default), depending on the configuration of the server additional ports may need to be added (check with the server administrator). Although this could be configured without an alias, using one makes it easier to add ports later:
FTP is a very old protocol that sends all communication in plain text including username and password, it is an insecure protocol don’t use it!
If there is no other option and FTP must be used there are several ports required, port 20 (FTP) and port 21 (FTP Control) or port 989 (FTPS) and port 990 (FTPS Control). Also if passive FTP is required then all ports numbered greater than 1024 and less than 65535 may need to be opened.
SFTP Rules
A better option is to use the SFTP (SSH File Transfer Protocol) as all communication is encrypted.
A specific rule for SSH will be required once the default allow ‘LAN to Any’ rule is turned off.
First an alias will need to be created for SSH (Port 22 is the default), depending on the configuration of the server additional ports may need to be added (check with the server administrator). Although this could be configured without an alias, using one makes it easier to add ports later:
- Navigate to Firewall - Aliases and select the Ports tab.
- Create an alias called SSH and specify all the port listed above.
- Select Save and the Apply Changes.
Now create the actual rules:
- Navigate to Firewall - Rules and select the LAN tab.
- Select add a new Pass rule for TCP from the LAN to anywhere for SSH (the alias created above) for SSH traffic.
- Action: Pass
- Interface: LAN
- Protocol: TCP
- Source: LAN net
- Destination (Type): any
- Destination: port range (from): SSH (the alias created above for SSH traffic).
- Description: SSH Allow
- Select Save.
- Order the firewall rules to have the SSH rule after the E-Mail rule.
- Select Apply Changes.
Progress Check
Any client computer should be able to access SSH services.
Turn off the Default Allow Rules
Now that the “essential” services have specific rules it’s time to turn off the default allow rules.
Edit both the “Default allow LAN to any rule” and the “Default allow LAN IPv6 to any rule” and set them to “Reject” and enable “Log packets…”.
Monitor the Firewall Logs to see if anything that may be needed is being rejected by the LAN rules:
- Navigate to Status - System Logs and select the Firewall tab.
- Type LAN in the Interface field and then select Filter.

iMessage and FaceTime Rules
It didn’t take long to notice that specific rules where needed for these two popular Apple Services.
From the Apple support article Using FaceTime and iMessage behind a firewall it becomes clear that quite a few ports need to be opened.
The approach taken for this project is to create three aliases:
- An IP alias for the address range 17.0.0.0/8 called Apple (Apple Address Range).
- A Ports alias for port 5223 called AppleTCP (Apple TCP Services).
- A Ports alias for ports 3478:3497, 16384:16387 and 16393:16402 called AppleUDP (Apple UDP Services).
- A Pass rule for TCP from the LAN to Apple (the alias created above) for AppleTCP (the alias created above).
- A Pass rule for UDP from the LAN to anywhere for AppleUDP (the alias created above).
- A Pass rule for UDP from the LAN for AppleUDP (the alias created above) to anywhere.
Resources
Below are several references that can can be useful when making decisions about firewall rules:
This concludes the LAN Firewall section…
Below are several references that can can be useful when making decisions about firewall rules:
- Ports used by Apple Products.
- Ports used by Microsoft Windows.
- Service Name and Transport Protocol Port Number Registry.
This concludes the LAN Firewall section…